Lesson Plan Editing
This article covers how to edit your lesson plan to take advantage of the features that it has.
Overview
A Running Reality Lesson Plan is a way to prepare a set of points in time across the world map so that you can step through these points in a classroom setting. You step through these points to visually augment the lecture you are giving, or let students step through them at their own pace. To build a lesson, the Running Reality editor gives you the ability to define and revise these points to best show the
Access
Access to lesson plans is controlled three ways: those who can edit, those who can lead a classroom session, and those who can follow along and view it. The only person who can edit a lesson plan is the person who purchased the blank lesson plan template -- that person is the creator. If you are the creator, you can also lead a classroom session making you a leader. (In the future, others can purchase a creator's pre-made lesson plan and then they can use it to lead their own classroom.) The leader then can grant the right for people to view the lesson, using a special access key. Anyone with that key can follow the lesson, so provide it only to your students and do not post it publicly.
The key also synchronizes viewer's screens to the lesson step that the leader is on, so that followers can be viewing the same thing. The leader may select three types of synchronization.
| None | Followers go at their own pace. |
| Lite | When the leader moves to new step, all followers move to that step, but they can still freely slide the map to explore until the next step. |
| Hard | Followers are set to the exact date and location of the step as the leader, with no ability to slide the map. |
Each lesson is considered published or draft. So long as it is draft, it can be edited. Once it is ready for students to use, it can be marked as published to prevent accidental edits before or during the next lecture.
| Published | No intentional or accidental edits allowed. Plan is available for students to view. Use the publish button to switch between draft and published states. |
| Draft | Full editing capabilities enabled. |
Editing the Metadata
Each lesson plan has meta data that you can edit, including a plan title, a short, one-paragraph description, hash tags, and an image. The title and description both show in the sidebar and help you find the plan among all the other plans you might have. The title, description, and hashtags are all used when doing a keyword search from the search box. Using some of the standard hashtags lets you find lessons that pair well with related official Running Reality history projects (places in history we need more data) and highlights (places in history where lots of data has been entered already). The image appears both in the editor's sidebar and in the student's map sidebar.
| Function | Purpose |
|---|---|
| EDIT DESCRIPTION | From this panel, you can edit the title, short description, and metadata hash tags |
| EDIT IMAGE | From this panel, you can also upload a thumbnail image that appears both in the editor's sidebar and in the student's map sidebar. You can upload any image, but it must be exactly square and it must be larger than 500 pixels and less than 2000 pixels wide. |
| EDIT SYNCHRONIZATION | From this panel, you can select the method for synchronizing between the classroom leader (the teacher) and followers (the students), as mentioned above. |
| OPEN IN BROWSER | This opens the lesson in a separate browser window, with the browser URL for the lesson including its access key |
| OPEN IN BROWSER (no labels) | Similar to the OPEN IN BROWSER button, except that this also configures the map to not show any labels. This can be helpful for doing screenshots. |
| PUBLISH | As mentioned above, publishing the lesson plan makes it read-only so that changes can not be made accidentally, especially when you are about to use it in a class. You can un-publish it at any time to make further edits. |
What are Detailed Steps
Steps build a detailed narrative using a set of predetermined points in time and location, with explanatory text. As you discuss a historical event, steps will ensure you can smoothly synchronize the map to your presentation. When someone raises their hand and says, "Back on that last point you made..." you can easily move the map to that exact same spot you had been on previously. When you move to the next topic, you don't have to break your flow to remember the exact date or the best zoom to frame the scene. Further, if your students have laptop or tablet computers and are following along in class or remotely, you can synchronize them to the steps. Your students don't have to lose time trying to follow you manually because their own screen will go to that same date or zoom.
| Display Only | Quickly step between the key times and locations without having to break stride during your presentation. |
| Using Synchronization | Student laptop or tablet displays automatically follow along with the teacher. |
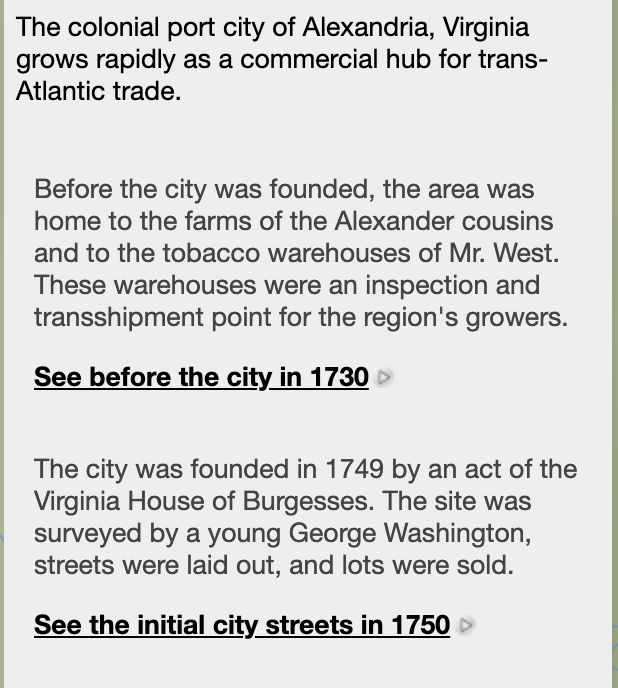
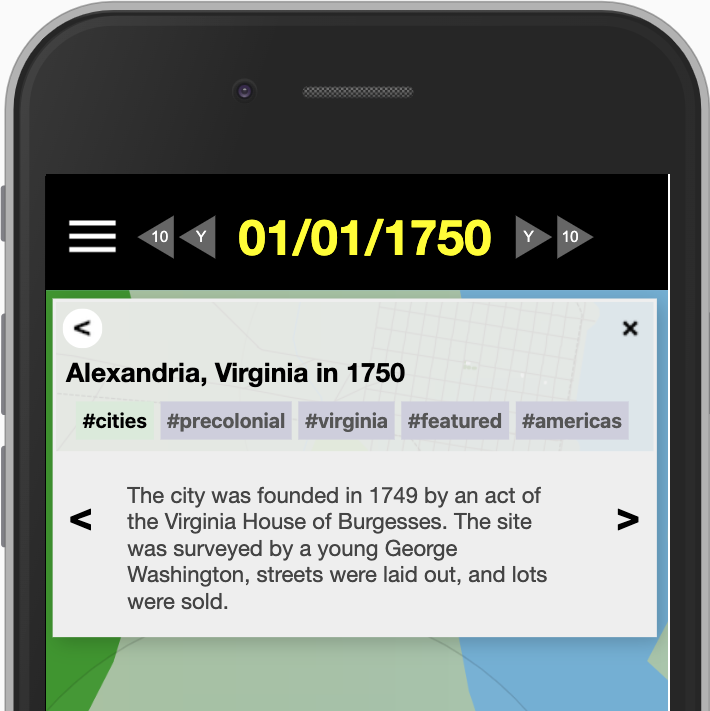
On large screens, they will expand vertically down the sidebar with clickable links to step from place to place. On small (mobile) screens, the text one step at a time will be shown at the top of the screen with an arrow to tap or swipe to the next step.
| Desktop / Tablet Appearance | Mobile Appearance |
|---|---|
 |
 |
Editing Detailed Steps
The detailed steps are shown in an editing panel, which shows the text of each step, the raw map location of the step, and the optional location label. Steps can be added, removed, or editing using the buttons shown down the right hand side of the panel.
| Function | Purpose |
|---|---|
| ADD STEP | Add a new step to the end of the sequence. To position it elsewhere in the sequence, use the move up and move down buttons after adding it. |
| REMOVE STEP | Deletes the selected step. Note that there is no undo and that deletions are permanent. |
| EDIT STEP | Edit the text of the selected step. This brings up a panel that lets you adjust, edit, correct, or expand the text. |
| EDIT LOCATION | Edit the location of the selected step. This brings up a panel that lets you position the step using a mini-map or by directly typing the values. Remember, location includes the date. |
| COPY LOCATION | Copies the prior location to the selected step. This can be convenient if you are slowly adjusting the position or date of each step in sequence, so that you can start the step where the prior step was, then just slightly adjust the date, zoom, or lat/lon. |
| CLEAR LOCATION | Clear any location information from the selected step. This removes any location change from the prior step so that changing step only shows the new step's text with no map change. |
| EDIT LOCATION LABEL | Edit the label (seen only on large screens) for the locaiton link. The label should be short and clear, with a verb to suggest it is click-able, such as 'See the shoreline in 1903'. On a mobile device, location links are not shown due to the small screen, so location labels should not include any critical information not in the main item text. |
| MOVE UP | Move the selected step up earlier in the sequence. This is helpful when adding a new step and the new step starts out by being added to the end of the sequence. |
| MOVE DOWN | Move the selected step down later in the sequence. |
With these controls, you can prepare the lesson so that it has the steps you will want to use when presenting to students.
Map Fidelity
Running Reality should be used as a secondary source, not as a primary source. Like an encyclopedia or a historical atlas, it provides a broad context. You can use that context to figure out new avenues for research, following links to cited reference works on topics that might be of value. It can also be part of how you teach to a secondary source. At this early stage in Running Reality project, you might expect there to still be blank areas or bugs in its model of history, so definitely check yourself against the works cited by the model's factoids or ask your students to help improve the map as a class project.
Feedback
If you can not find an answer here, please feel free to ask us for help. Send us an email if you would like us to get back to you with a response: